Server Carto4CH deployment
Introduction
We will explain here how to deploy and customize a Carto4CH production server at a 4CH project partner.
Status
The deployment package is operational.
Do not hesitate to contact us if you wish to install one.
Forks + Customisation
| Original projects | Forks + customization |
|---|---|
 | Each sub-project of a Carto4CH server is a fork of an original project maintained by the Virtual Assembly (AV). - Archipelago, - Minicourse This means that the Carto4CH project is doubly supported, both by the members of the 4CH team and by the members of the AV association. |
Docker deployment
| Original projects | Git clone + AddOn |
|---|---|
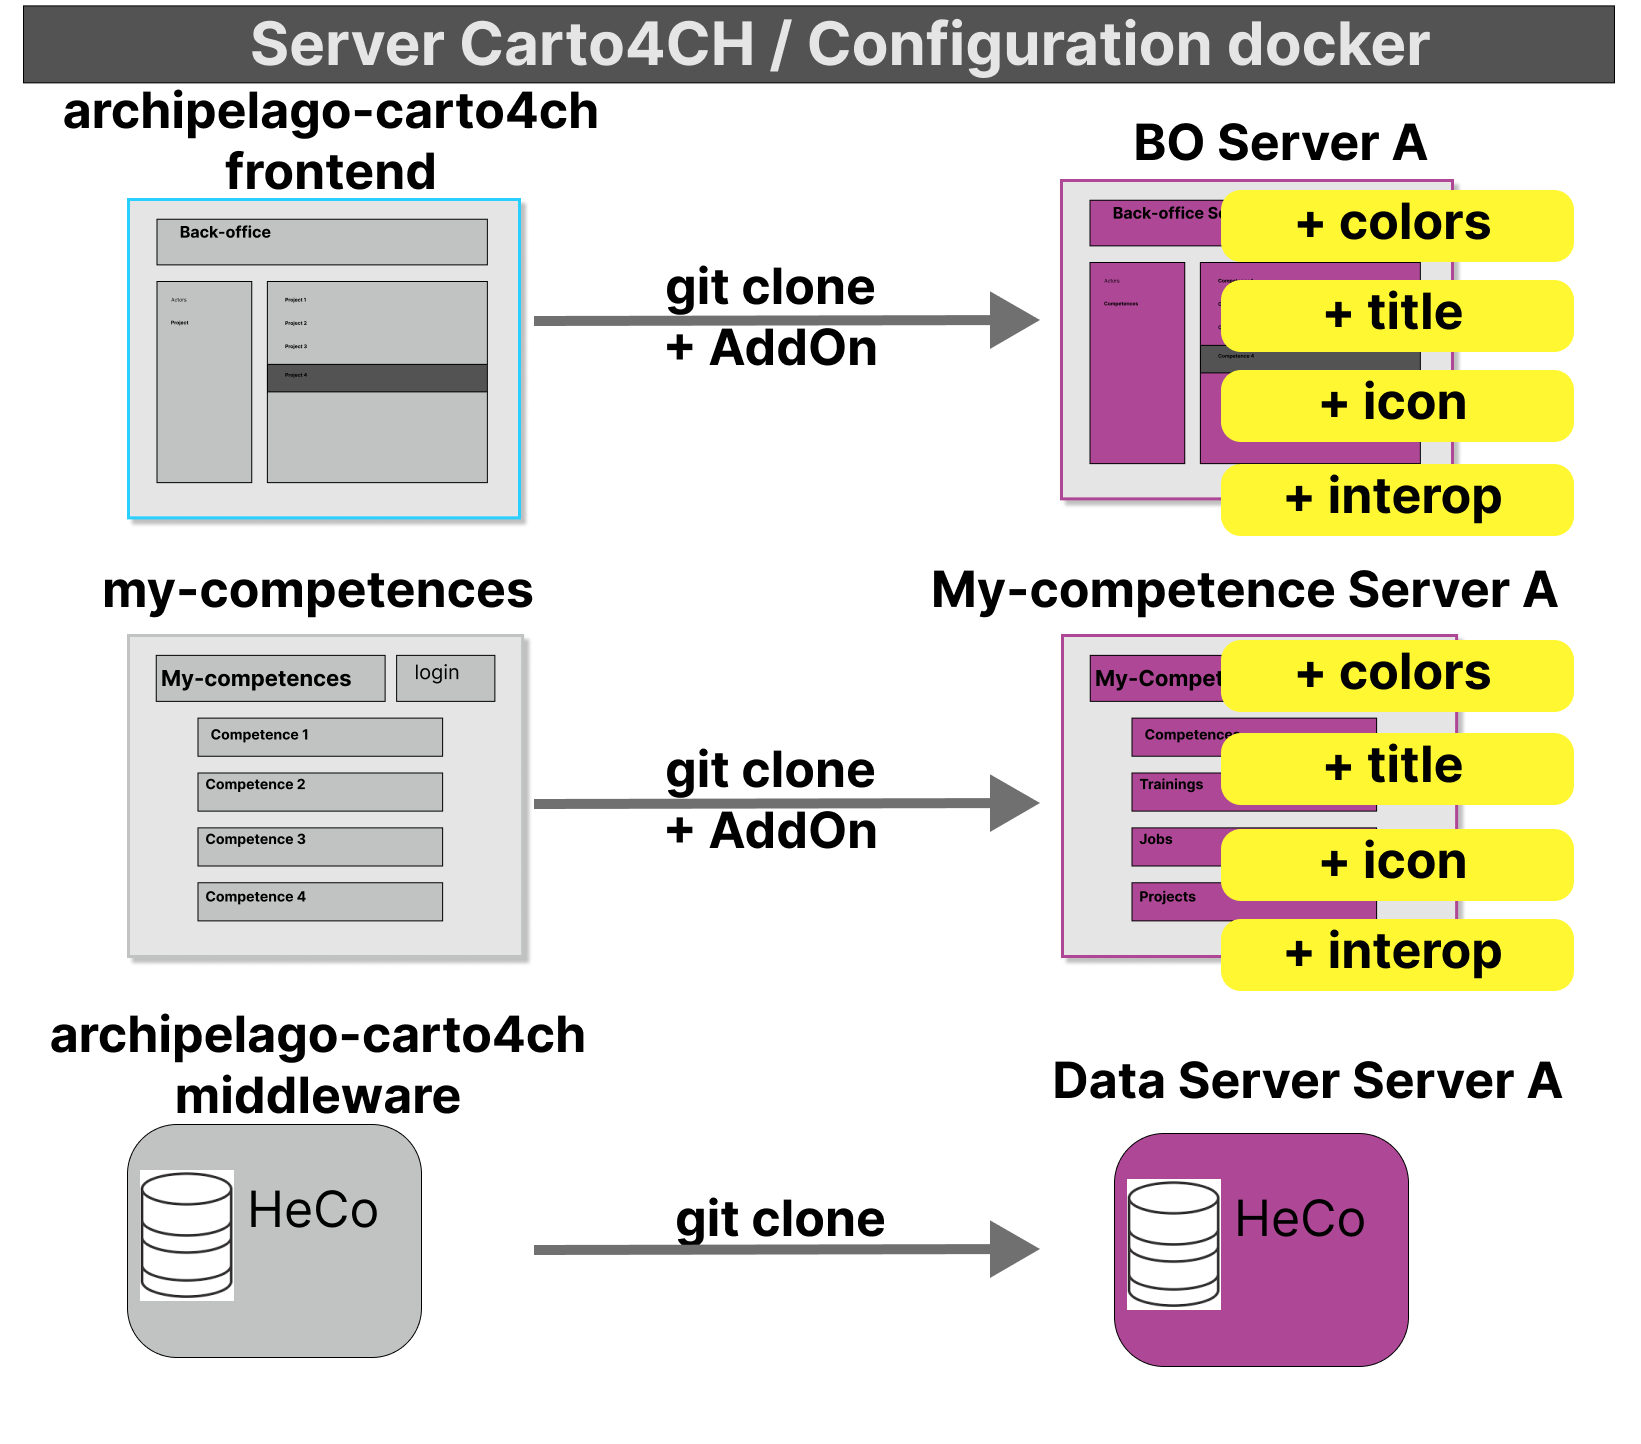 | Each docker project on a Carto4CH server performs a git clone from the Archipelago-Carto-4ch projects (middleware and frontend) or My-competences. It then retrieves specific files from the AddOn directory to customise the colours, title or interoperability parameters. |
Deployed modules
| Schema | Presentation |
|---|---|
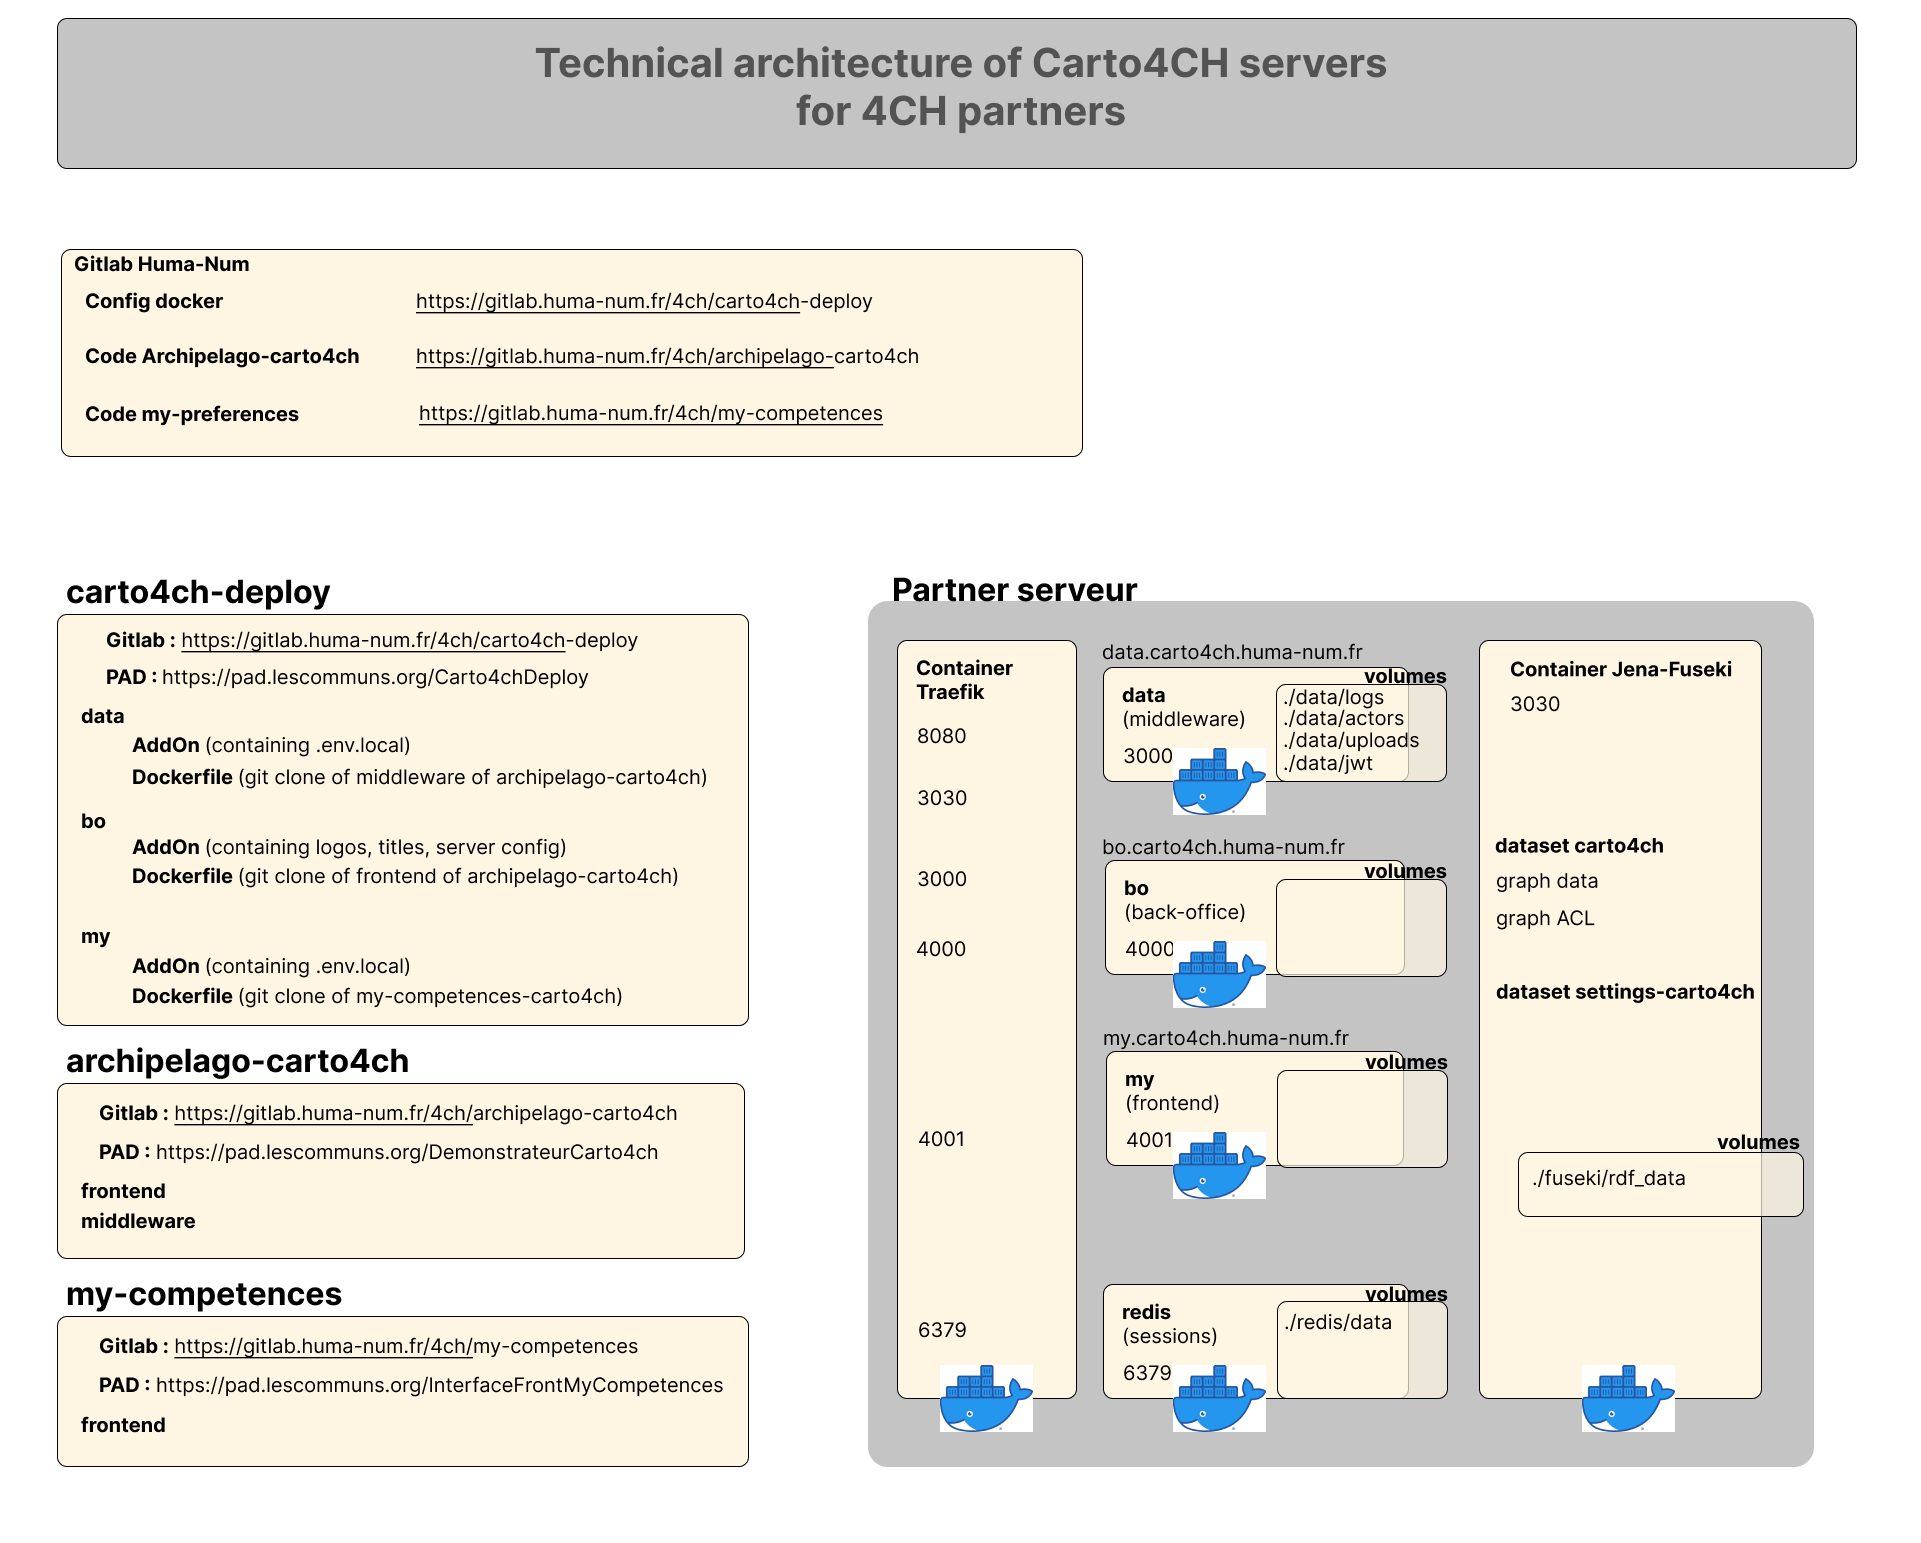 | The Carto4CH-deploy Git project allows a partner to install its own Carto4CH server. It contains 5 docker containers
|
How to install your server ?
Requirements
- Internet access
- Hardware configuration with at least 4GB RAM
- Have installed Docker and docker-compose
- Have installed Make
Clone the project
Retrieve the project from your server:
git clone git@gitlab.huma-num.fr:4ch/carto4ch-deploy.git
Setting up your instance
Enter the project:
cd carto4ch-deploy
Domain name in traefik
Update the docker-compose.yaml file in the root with your reserved domain name for your instance.
  data:
    build:
...
    expose:
      - "3000"
    labels:
      - "traefik.enable=true"
      - "traefik.http.routers.data.rule=Host(`data.carto4ch.<nom de domaine>`)"
...
Setting up the back office (bo)
Next, update the instance name, logos and colours by modifying the AddOn in the bo directory.
These AddOn override certain files in the basic Git.
Firstly, the .env.local file
SEMAPPS_INSTANCE_NAME=Back-office (Serveur A) // Set here the name of the instance
REACT_APP_MIDDLEWARE_URL=https://data.carto4ch.huma-num.fr/ // Set here the middleware URL
PORT=4000 // We recommend that you keep the ports specified in the documentation
REACT_APP_LANG=fr // Choose your language
Do not keep comments at the end of the line. It could generate some problems at execution.
The public directory contains the images :
- favicon.ico
- logo192.png
- logo512.png Can be replaced by any images you like
The public/index.html file contains the instance name in several places
    <meta
      name="description"
      content="Back-office [Server A]"
    />
...
    <title>Back-office [Server A]</title>
src/App.js file contains :
- the colours of the banner and font
theme.palette.primary.main = "#AE4796"
- the instance name again (for react-admin)
const App = () => (
  <Admin
    disableTelemetry
    history={history}
    title="Server A"
The src/config/dataServer.js file if you wish to connect to another server or manage a mirror (see documentation on interoperability).
Setting up My competence (my)
As with the Back Office, you can update the instance name, logos and colours by modifying the AddOn in the my directory.
These AddOn override certain files in the base Git.
Deployment
Run the installation :
make start-prod
You can also do it in two stages:
make build-prod follows by make start-prod
To check that all went well, you can view the logs with the command :
make log-prod
Access
Once you have deployed your server (and configured your DNS), you can access :
- https://data.carto4ch.your-domain-name // To access the middleware and browse data in LDP.
- https://bo.carto4ch.your-domain-name // To access the back office
- https://my.carto4ch.your-domain-name // To access My-competence
Authentication
If you have any questions about authentication (configuration of an SSO server or the common server), please contact us.
Homepage
Then, you can configure a homepage with markdown description in Archipelago-carto4CH, by creating a new page (Menu > config > Page) with name "accueil" (or change it in the code). This page will appear when the application is launched.